The following steps should look familiar to typical workflows for pull request
contributions. Feel free to consult
GitHub Help
if you need more information using pull requests. HEIR-specific processes begin
at the pull request review stage.
Setup
Fork the HEIR repository by clicking the Fork button on the
repository page. This creates a copy of the
HEIR repository on your own GitHub account, where you can make changes.
Setting up git to work with fork and upstream remotes.
If you have cloned your fork, you will want to
add the HEIR repository as an upstream remote:
Either way, you will want to create a development branch for your change:
git checkout -b name-of-change
In the remainder of this document, we will assume origin is your fork, and
upstream is the main HEIR repo.
Sign the
Contributor License Agreement
(CLA). If you are working on HEIR as part of your employment, you might have
to instead sign a Corporate CLA. See more
here.
Preparing a pull request
Sync your changes against the upstream HEIR repository, i.e., make sure your
contributions are (re)based of the most recent upstream/main commit.
Check HEIR’s lint and style checks by running the following from the top of
the repository:
When a new PR is submitted, it is inspected for quality requirements, such as
the CLA requirement, and a sufficient PR description.
If the PR passes checks, we assign a reviewer. If not, we request additional
changes to ensure the PR passes CI checks.
Review
A reviewer will check the PR and potentially request additional changes.
If a change is needed, the contributor is requested to make a suggested
change. Please make changes with additional commits to your PR, to ensure that
the reviewer can easily see the diff.
If all looks good, the reviewer will approve the PR.
This cycle repeats itself until the PR is approved.
Approved
At this stage, you must squash your commits into a single commit.
Once the PR is approved, a GitHub workflow will
check
your PR for multiple commits. You may use the git rebase -i to squash the
commits. Pull requests must consist of a single git commit before merging.
Pull Ready
Once the PR is squashed into a single git commit, a maintainer will apply the
pull ready label.
This initiates the internal code migration and presubmits.
After the internal process is finished, the commit will be added to main and
the PR closed as merged by that commit.
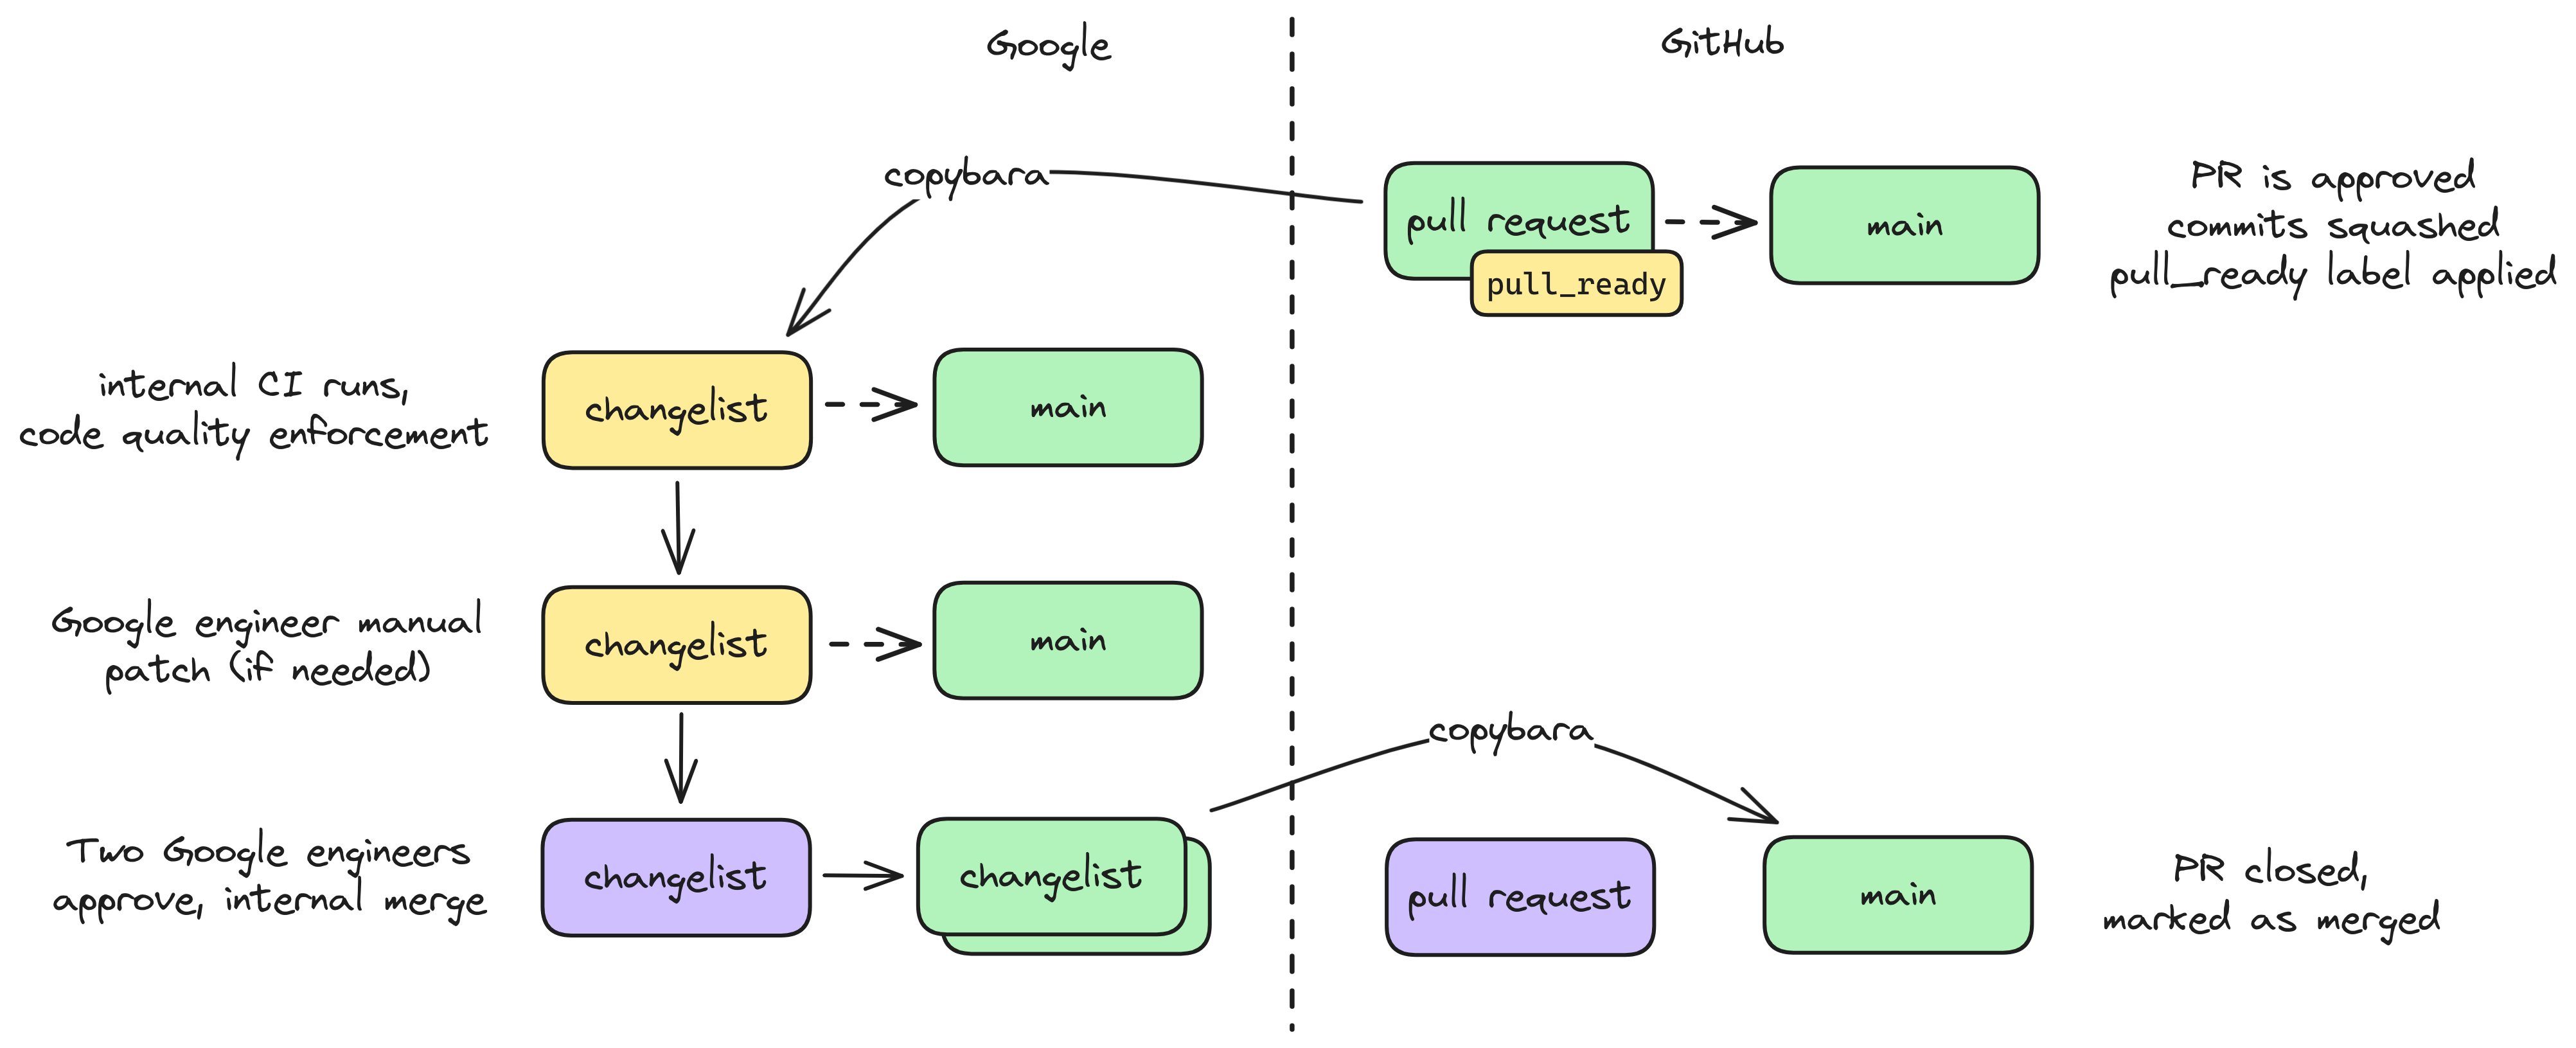
Internal review details
This diagram summarizes the GitHub/Google code synchronization process. This is
largely automated by a Google-owned system called
Copybara, the configuration for which is
Google-internal. This system treats the Google-internal version of HEIR as the
source of truth, and applies specified transformation rules to copy internal
changes to GitHub and integrate external PRs internally.
Notable aspects:
The final merged code may differ slightly from a PR. The changes are mainly to
support stricter internal requirements for BUILD files that we cannot
reproduce externally due to minor differences between Google’s internal build
systems and bazel that we don’t know how to align. Sometimes they will also
include additional code quality fixes suggested by internal static analyzers
that do not exist outside of Google.
Due to the above, signed commits with internal modifications will not maintain
valid signatures after merging, which labels the commit with a warning.
You will see various actions taken on GitHub that include copybara in the
name, such as changes that originate from Google engineers doing various
approved migrations (e.g., migrating HEIR to support changes in MLIR or
abseil).
A diagram summarizing the copybara flow for HEIR internally to Google
Why bother with Copybara?
tl;dr: Automatic syncing with upstream MLIR and associated code migration.
Until HEIR has a formal governance structure in place, Google
engineers—specifically Asra Ali, Shruthi Gorantala, and Jeremy Kun—are the
codebase stewards. Because the project is young and the team is small, we want
to reduce our workload. One important aspect of that is keeping up to date with
the upstream MLIR project and incorporating bug fixes and new features into
HEIR. Google also wishes to stay up to date with MLIR and LLVM, and so it has
tooling devoted to integrating new MLIR changes into Google’s monorepo every few
hours. As part of that rotation, a set of approved internal projects that depend
on MLIR (like TensorFlow) are patched to support breaking changes in MLIR. HEIR
is one of those approved projects.
As shown in the previous section, the cost of this is that no change can go into
HEIR without at least two Googlers approving it, and the project is held to a
specific set of code quality standards, namely Google’s. We acknowledge these
quirks, and look forward to the day when HEIR is useful enough and important
enough that we can revisit this governance structure with the community.
Pre-Commit
We use pre-commit to manage a series of git
pre-commit hooks for the project; for example, each time you commit code, the
hooks will make sure that your C++ is formatted properly. If your code isn’t,
the hook will format it, so when you try to commit the second time you’ll get
past the hook. Configuration for
codespell, which catches
spelling mistakes, is in pyproject.toml.
All hooks are defined in .pre-commit-config.yaml. To install these hooks,
first run
pip install -r requirements.txt
You will also need to install ruby and go (e.g., apt-get install ruby golang)
which are used by some of the pre-commits. Note that the pre-commit environment
expects Python 3.11
(Installing python3.11 on ubuntu).
Then install the hooks to run automatically on git commit:
pre-commit install
To run them manually, run
pre-commit run --all-files
Tips for building dependencies / useful external libraries
Sometimes it is useful to point HEIR to external dependencies built according to
the project’s usual build system, instead of HEIR’s bazel overlay. For example,
to test upstream contributions to the dependency in the context of how it will
be used in HEIR.
MLIR
Instructions for building MLIR can be found on the
Getting started page of the MLIR
website. The instructions there seem to work as written (tested on Ubuntu
22.04). However, the command shown in Unix-like compile/testing: may require a
large amount of RAM. If building on a system with 16GB of RAM or less, and if
you don’t plan to target GPUs, you may want to replace the line
-DLLVM_TARGETS_TO_BUILD="Native;NVPTX;AMDGPU" \
with
-DLLVM_TARGETS_TO_BUILD="Native" \
OpenFHE
A simple way to build OpenFHE is to follow the instructions in the
openfhe-configurator
repository. This allows to build the library with or without support for the
Intel HEXL library which adds AVX512 support.
First, clone the repository and configure it using:
git clone https://github.com/openfheorg/openfhe-configurator.git
cd openfhe-configurator
scripts/configure.sh
You will be asked whether to stage a vanilla OpenFHE build or add support for
HEXL. You can then build the library using
./scripts/build-openfhe-development.sh
The build may fail on systems with less than 32GB or RAM due to parallel
compilation. You can disable it by editing
./scripts/build-openfhe-development.sh and replacing
make -j || abort "Build of openfhe-development failed."
with
make || abort "Build of openfhe-development failed."
Compilation will be significantly slower but should then take less than 8GB of
memory.
This project’s policy is that contributors can use whatever tools they would
like to craft their contributions, but there must be a human in the loop.
Contributors must read and review all LLM-generated code or text before they
ask other project members to review it. The contributor is always the author
and is fully accountable for their contributions. Contributors should be
sufficiently confident that the contribution is high enough quality that asking
for a review is a good use of scarce maintainer time, and they should be able
to answer questions about their work during review.
We expect that new contributors will be less confident in their contributions,
and our guidance to them is to start with small contributions that they can
fully understand to build confidence. We aspire to be a welcoming community that
helps new contributors grow their expertise, but learning involves taking small
steps, getting feedback, and iterating. Passing maintainer feedback to an LLM
doesn’t help anyone grow, and does not sustain our community.
Contributors are expected to be transparent and label contributions that
contain substantial amounts of tool-generated content. Our policy on labelling
is intended to facilitate reviews, and not to track which parts of the project
are generated. Contributors should note tool usage in their pull request
description, commit message, or wherever authorship is normally indicated for
the work. For instance, use a commit message trailer like
Assisted-by: <name of code assistant>. This transparency helps the community
develop best practices and understand the role of these new tools.
This policy includes, but is not limited to, the following kinds of
contributions:
Code, usually in the form of a pull request
RFCs or design proposals
Issues or security vulnerabilities
Comments and feedback on pull requests
Details
To ensure sufficient self review and understanding of the work, it is strongly
recommended that contributors write PR descriptions themselves (if needed, using
tools for translation or copy-editing). The description should explain the
motivation, implementation approach, expected impact, and any open questions or
uncertainties to the same extent as a contribution made without tool assistance.
An important implication of this policy is that it bans agents that take action
in our digital spaces without human approval, such as the GitHub
@claude agent. Similarly, automated review tools
that publish comments without human review are not allowed. However, an opt-in
review tool that keeps a human in the loop is acceptable under this policy.
As another example, using an LLM to generate documentation, which a contributor
manually reviews for correctness, edits, and then posts as a PR, is an approved
use of tools under this policy.
AI tools must not be used to fix GitHub issues labelled
good first issue. These issues are generally not urgent,
and are intended to be learning opportunities for new contributors to get
familiar with the codebase. Fully automating the process of fixing this issue
squanders the learning opportunity and doesn’t add much value to the project.
New contributors using AI tools to fix issues labelled as “good first issues”
is forbidden.
Extractive Contributions
The reason for our “human-in-the-loop” contribution policy is that processing
patches, PRs, RFCs, and comments is not free – it takes a lot of maintainer
time and energy to review those contributions! Sending the unreviewed output of
an LLM to open source project maintainers extracts work from them in the form
of design and code review, so we call this kind of contribution an “extractive
contribution”.
Our golden rule is that a contribution should be worth more to the project
than the time it takes to review it. These ideas are captured by this quote from
the book Working in Public by Nadia Eghbal:
“When attention is being appropriated, producers need to weigh the costs and
benefits of the transaction. To assess whether the appropriation of attention
is net-positive, it’s useful to distinguish between extractive and
non-extractive contributions. Extractive contributions are those where the
marginal cost of reviewing and merging that contribution is greater than the
marginal benefit to the project’s producers. In the case of a code
contribution, it might be a pull request that’s too complex or unwieldy to
review, given the potential upside.” – Nadia Eghbal
Prior to the advent of LLMs, open source project maintainers would often review
any and all changes sent to the project simply because posting a change for
review was a sign of interest from a potential long-term contributor. While new
tools enable more development, it shifts effort from the implementer to the
reviewer, and our policy exists to ensure that we value and do not squander
maintainer time.
Reviewing changes from new contributors is part of growing the next generation
of contributors and sustaining the project. We want the HEIR project to be
welcoming and open to aspiring scientists and engineers who are willing to
invest time and effort to learn and grow, because growing our contributor base
and recruiting new maintainers helps sustain the project over the long term.
Handling Violations
If a maintainer judges that a contribution doesn’t comply with this policy, they
should paste the following response to request changes:
This PR doesn't appear to comply with our policy on tool-generated content,
and requires additional justification for why it is valuable enough to the
project for us to review it. Please see our developer policy on
AI-generated contributions: https://heir.dev/docs/development/ai_policy/
The best ways to make a change less extractive and more valuable are to reduce
its size or complexity or to increase its usefulness to the community. These
factors are impossible to weigh objectively, and our project policy leaves this
determination up to the maintainers of the project, i.e. those who are doing the
work of sustaining the project.
If or when it becomes clear that a GitHub issue or PR is off-track and not
moving in the right direction, maintainers should apply the extractive label
to help other reviewers prioritize their review time.
If a contributor responds but doesn’t make their change meaningfully less
extractive, maintainers should escalate to the relevant admin to lock the
conversation.
References
Our policy was informed by experiences in other communities:
The buildifier tool can be used to format BUILD files. You can download the
latest Buildifier release from the
Bazel Release Page.
See IDE configuration for tips on integrating this
with your IDE.
Avoiding rebuilds
Bazel is notoriously fickle when it comes to deciding whether a full rebuild is
necessary, which is bad for HEIR because rebuilding LLVM from scratch takes 15
minutes or more. We try to avoid this as much as possible by setting default
options in the project root’s .bazelrc.
The main things that cause a rebuild are:
A change to the .bazelrc that implicitly causes a flag change. Note HEIR has
its own project-specific .bazelrc in the root directory.
A change to the command-line flags passed to bazel, e.g., -c opt vs -c dbg
for optimization level and debug symbols. The default is -c dbg, and you may
want to override this to optimize performance of generated code. For example,
the OpenFHE backend generates much faster code when compiled with -c opt.
A change to relevant command-line variables, such as PATH, which is avoided
by the incompatible_strict_action_env flag. Note activating a python
virtualenv triggers a PATH change. The default is
incompatible_strict_action_env=true, and you would override this in the
event that you want your shell’s environment variables to change and be
inherited by bazel.
Pointing HEIR to a local clone of llvm-project
Occasionally changes in HEIR will need to be made in tandem with upstream
changes in MLIR. In particular, we occasionally find upstream bugs that only
occur with HEIR passes, and we are the primary owners/users of the upstream
polynomial dialect.
To tell bazel to use a local clone of llvm-project instead of a pinned
commit hash, replace bazel/import_llvm.bzl with the following file:
cat > bazel/import_llvm.bzl << EOF
"""Provides the repository macro to import LLVM."""

def import_llvm(name):
    """Imports LLVM."""
    native.new_local_repository(
        name = name,
        # this BUILD file is intentionally empty, because the LLVM project
        # internally contains a set of bazel BUILD files overlaying the project.
        build_file_content = "# empty",
        path = "/path/to/llvm-project",
    )
EOF
The next bazel build will require a full rebuild if the checked-out LLVM
commit differs from the pinned commit hash in bazel/import_llvm.bzl.
Note that you cannot reuse the LLVM CMake build artifacts in the bazel build.
Based on what you’re trying to do, this may require some extra steps.
If you just want to run existing MLIR and HEIR tests against local
llvm-project changes, you can run the tests from HEIR using
bazel test @llvm-project//mlir/...:all. New lit tests can be added in
llvm-project’s existing directories and tested this way without a rebuild.
If you add new CMake targets in llvm-project, then to incorporate them into
HEIR you need to add new bazel targets in
llvm-project/utils/bazel/llvm-project-overlay/mlir/BUILD.bazel. This is
required if, for example, a new dialect or pass is added in MLIR upstream.
Send any upstream changes to HEIR-relevant MLIR files to @j2kun (Jeremy Kun) who
has LLVM commit access and can also suggest additional MLIR reviewers.
Finding the right dependency targets
Whenever a new dependency is added in C++ or Tablegen, a new bazel BUILD
dependency is required, which requires finding the path to the relevant target
that provides the file you want. In HEIR the BUILD target should be defined in
the same directory as the file you want to depend on (e.g., the targets that
provide foo.h are in BUILD in the same directory), but upstream MLIR’s bazel
layout is different.
LLVM’s bazel overlay for MLIR is contained in a
single file,
and so you can manually look there to find the right target. With bazel, if you
know the filepath of interested you can also run:
where <path> is the path relative to mlir/ in the llvm-project project
root. For example, to find the target that provides
mlir/include/mlir/Pass/PassBase.td, run
You can find more examples and alternative queries at the
Bazel query docs.
3 - Boilerplate tools
The script scripts/templates/templates.py contains commands for generating new
dialects and transforms, filling in most of the boilerplate Tablegen and C++.
These commands do not add the code needed to register the new passes or
dialects in heir-opt.
These should be used when the tablegen files containing existing pass
definitions in the expected filepaths are not already present. Otherwise, you
must modify the existing tablegen files directly.
Run python scripts/templates/templates.py --help and
python scripts/templates/templates.py <subcommand> --help for the available
commands and options.
Creating a New Pass
General passes
If the pass does not operate from and to a specific dialect, use something
similar to:
Note that all --enable flags are True by default, so if you know your
dialect will not have attributes or types, you have to explicitly disable those
options.
4 - IDE configuration
heir-lsp
HEIR provides an LSP server that extends the MLIR LSP server with HEIR’s
dialects.
Build the LSP binary, then move it to a location on your path or point your IDE
to bazel-bin/tools/heir-lsp.
Note that if you change any HEIR dialects, or if HEIR’s dependency on MLIR
updates and the upstream MLIR has dialect changes (which happens roughly daily),
you need to rebuild heir-lsp for it to recognize the changes.
clangd
Most IDE configured to use clangd can be powered from a file called
compile_commands.json. To generate that for HEIR, run
bazel run @hedron_compile_commands//:refresh_all
This will need to be regenerated when there are major BUILD file changes. If
you encounter errors like *.h.inc not found, or syntax errors inside these
files, you may need to build those targets and then re-run the refresh_all
command above.
Note that you will most likely also need to install the actual clangd language
server, e.g., sudo apt-get install clangd on debian/ubuntu.
ibazel file watcher
ibazel is a shell around
bazel that watches a build target for file changes and automatically rebuilds.
ibazel build //tools:heir-opt
VS Code
While a wide variety of IDEs and editors can be used for HEIR development, we
currently only provide support for VSCode.
Setup
For the best experience, we recommend following these steps:
VS Code should automatically detect buildifier. If this is not successful, you
can manually set the “Buildifier Executable” setting for the Bazel extension
(bazel.buildifierExecutable).
Disable the
C/C++ (aka ‘cpptools’)
extension (either completely, or in the current workspace).
Add the following snippet to your VS Code user settings found in
.vscode/settings.json to enable autocomplete based on the
compile_commands.json file (see above).
For Python formatting, HEIR uses pyink for
autoformatting, which is a fork of the more commonly used
black formatter with some patches to support
Google’s internal style guide. To use it in VSCode, install pyink along with
other python utilities needed for HEIR: pip install -r requirements.txt and
install the
Black Formatter
extension, then add the following to your VSCode user settings
(.vscode/settings.json):
You can add as many different configurations as necessary.
Add Breakpoints to your program as desired.
Open the Run/Debug panel on the left, select the desired configuration and
run/debug it.
Note that you might have to hit “Enter” to proceed past the Bazel build. It
might take several seconds between hitting “Enter” and the debug terminal
opening.
Tree-sitter configuration for relevant project languages
require('nvim-treesitter.configs').setup{ensure_installed={"markdown_inline",-- for markdown in tablegen"mlir","tablegen","verilog",-- for yosys},-- <... other config options ...>}
Telescope-alternate config (quickly jump between cc, header, and tablegen files)
Navigate to the bazel build target for current file
vim.keymap.set('n','<leader>eb',function()-- expand("%:p:h") gets the current filepathlocalbuildfile=vim.fn.expand("%:p:h").."/BUILD"-- expand("%:t") gets the current filename with suffix.localtarget=vim.fn.expand("%:t")vim.api.nvim_command("botright vsplit "..buildfile)vim.cmd("normal /"..target..vim.api.nvim_replace_termcodes("<CR>",true,true,true))vim.cmd("normal zz")end,{noremap=true})
Set include guards according to HEIR style guide.
localfunctionbuild_include_guard()-- project relative filepathlocalabs_path=vim.fn.expand("%")localrel_path=vim.fn.fnamemodify(abs_path,":~:.")-- screaming caselocalupper=string.upper(rel_path)-- underscore separatedlocalunderscored=string.gsub(upper,"[./]","_")-- trailing underscorereturnunderscored.."_"end-- mnemonic: fi = fix include (guard)vim.keymap.set('n','<leader>fi',function()localbuf=vim.api.nvim_get_current_buf()localinclude_guard=build_include_guard()localifndef="#ifndef "..include_guardlocaldefine="#define "..include_guardlocalendif="#endif // "..include_guardvim.api.nvim_buf_set_lines(buf,0,2,false,{ifndef,define})vim.api.nvim_buf_set_lines(buf,-2,-1,false,{endif})end,{noremap=true})