Development
This guide and its sub-pages assume you have successfully built the HEIR project from source.
Contributing code to HEIR
The following steps should look familiar to typical workflows for pull request contributions. Feel free to consult GitHub Help if you need more information using pull requests. HEIR-specific processes begin at the pull request review stage.
Setup
Fork the HEIR repository by clicking the Fork button on the repository page. This creates a copy of the HEIR repository on your own GitHub account, where you can make changes.
Setting up git to work with fork and upstream remotes.
If you have cloned your fork, you will want to add the HEIR repository as an upstream remote:git remote add upstream https://www.github.com/google/heirAlternatively, if you have cloned the main HEIR repo, you can add your fork as a remote like this:
git remote rename origin upstream
git remote add origin https://www.github.com/<USERNAME>/heir
Either way, you will want to create a development branch for your change:
git checkout -b name-of-changeIn the remainder of this document, we will assume
originis your fork, andupstreamis the main HEIR repo.Sign the Contributor License Agreement (CLA). If you are working on HEIR as part of your employment, you might have to instead sign a Corporate CLA. See more here.
Preparing a pull request
Sync your changes against the upstream HEIR repository, i.e., make sure your contributions are (re)based of the most recent
upstream/maincommit.Check HEIR’s lint and style checks by running the following from the top of the repository:
pre-commit run --all-files
If failed, check Pre-commit.
Make sure tests are passing with the following:
bazel test //...Once you are ready with your change, create a commit, e.g.:
git add change.cpp
git commit -m "Detailed commit message"
git push --set-upstream origin name-of-change
Pull request review flow
- New PR:
- When a new PR is submitted, it is inspected for quality requirements, such as the CLA requirement, and a sufficient PR description.
- If the PR passes checks, we assign a reviewer. If not, we request additional changes to ensure the PR passes CI checks.
- Review
- A reviewer will check the PR and potentially request additional changes.
- If a change is needed, the contributor is requested to make a suggested change. Please make changes with additional commits to your PR, to ensure that the reviewer can easily see the diff.
- If all looks good, the reviewer will approve the PR.
- This cycle repeats itself until the PR is approved.
- Approved
- At this stage, you must squash your commits into a single commit.
- Once the PR is approved, a GitHub workflow will
check
your PR for multiple commits. You may use the
git rebase -ito squash the commits. Pull requests must consist of a single git commit before merging.
- Pull Ready
- Once the PR is squashed into a single git commit, a maintainer will apply the
pull readylabel. - This initiates the internal code migration and presubmits.
- After the internal process is finished, the commit will be added to
mainand the PR closed as merged by that commit.
Internal review details
This diagram summarizes the GitHub/Google code synchronization process. This is largely automated by a Google-owned system called Copybara, the configuration for which is Google-internal. This system treats the Google-internal version of HEIR as the source of truth, and applies specified transformation rules to copy internal changes to GitHub and integrate external PRs internally.
Notable aspects:
- The final merged code may differ slightly from a PR. The changes are mainly to support stricter internal requirements for BUILD files that we cannot reproduce externally due to minor differences between Google’s internal build systems and bazel that we don’t know how to align. Sometimes they will also include additional code quality fixes suggested by internal static analyzers that do not exist outside of Google.
- Due to the above, signed commits with internal modifications will not maintain valid signatures after merging, which labels the commit with a warning.
- You will see various actions taken on GitHub that include
copybarain the name, such as changes that originate from Google engineers doing various approved migrations (e.g., migrating HEIR to support changes in MLIR or abseil).
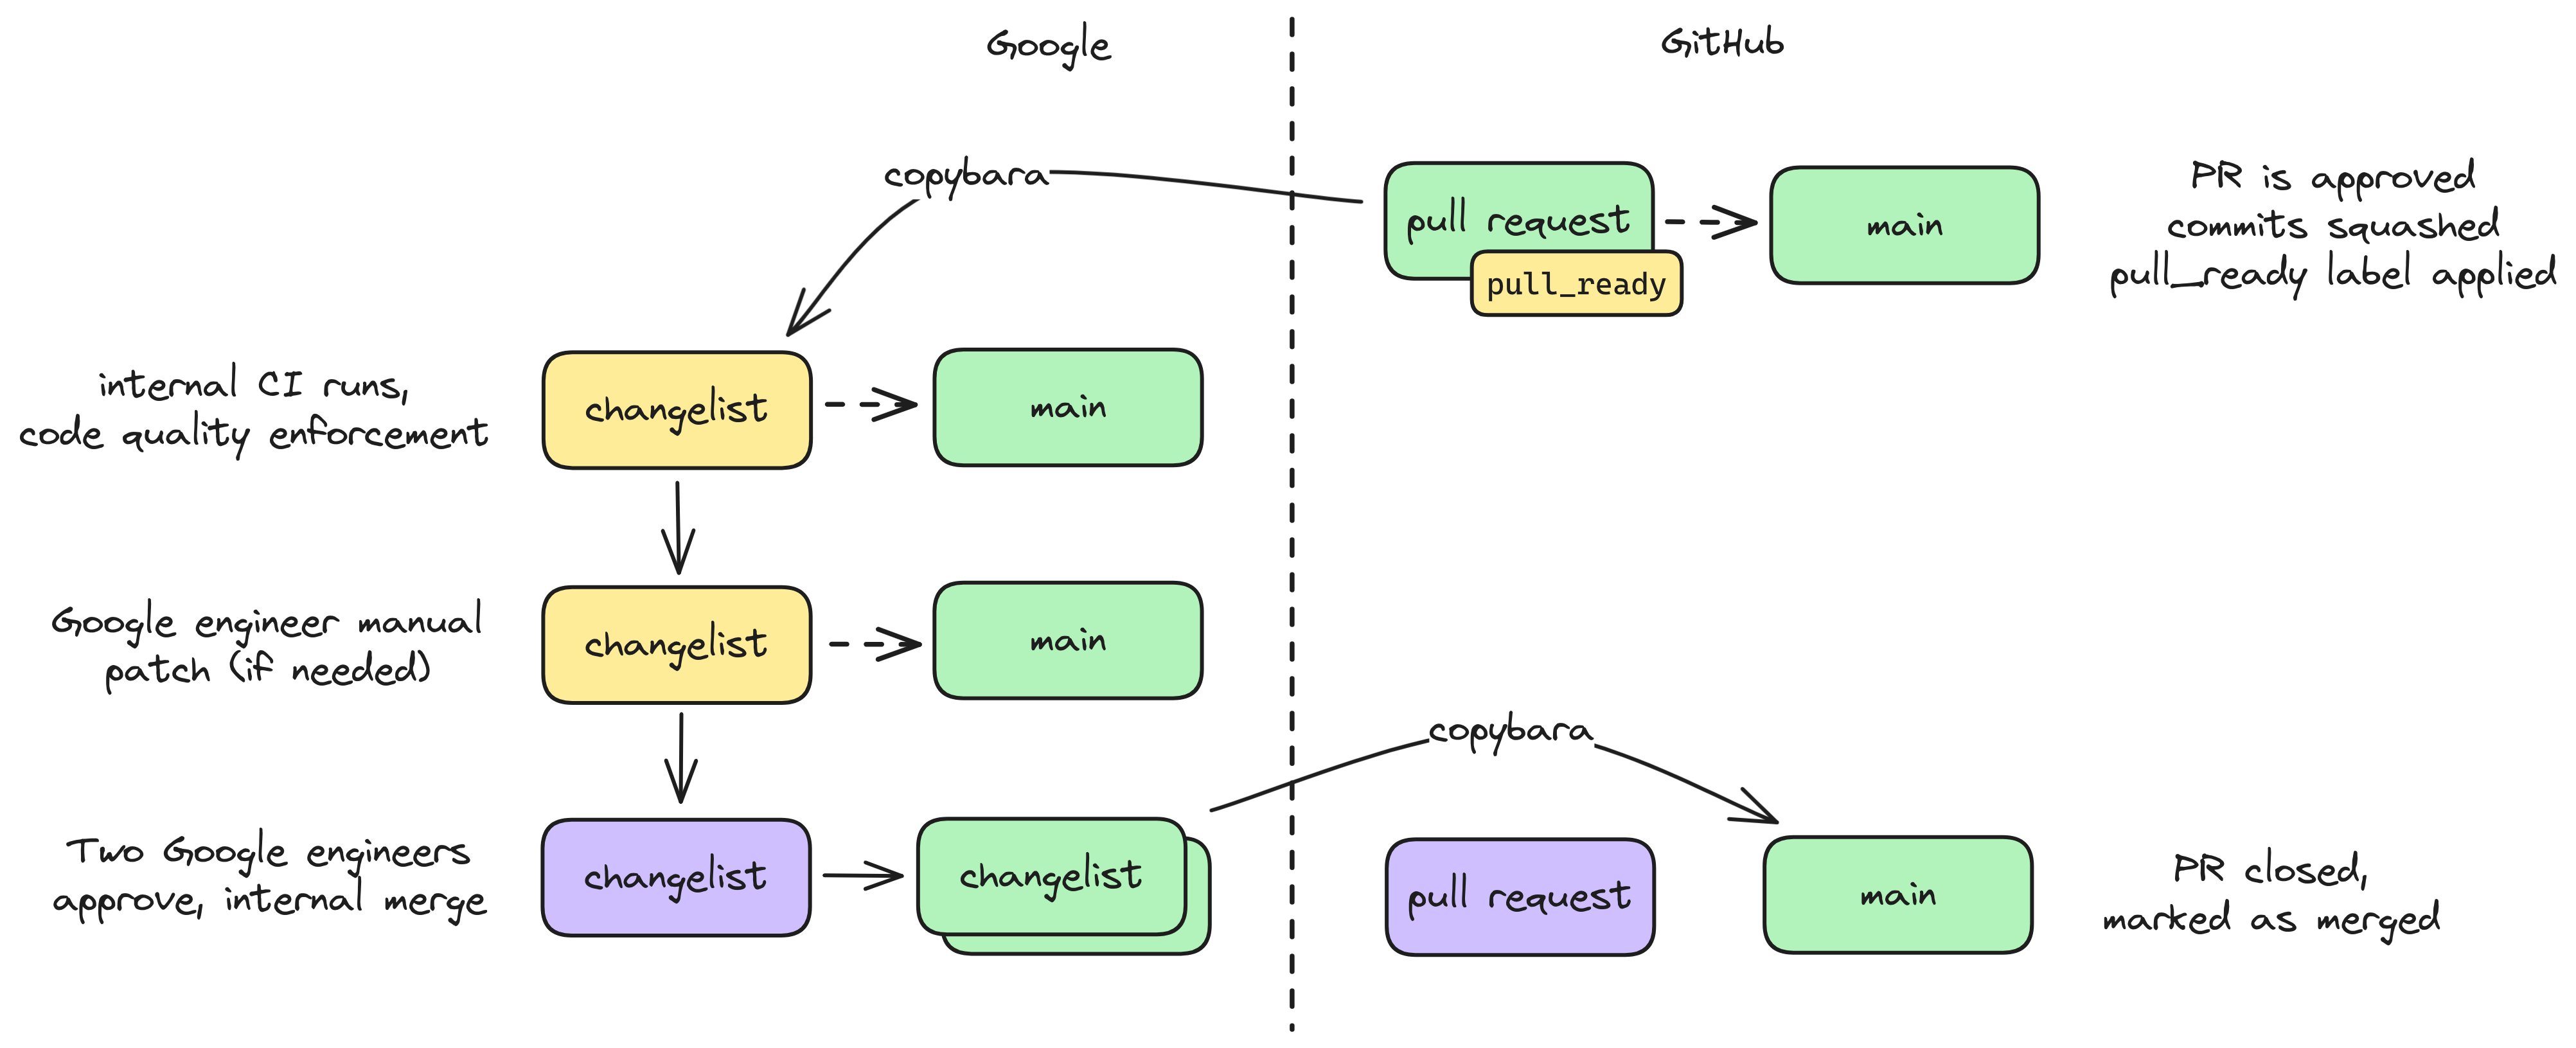
A diagram summarizing the copybara flow for HEIR internally to Google
Why bother with Copybara?
tl;dr: Automatic syncing with upstream MLIR and associated code migration.
Until HEIR has a formal governance structure in place, Google engineers—specifically Asra Ali, Shruthi Gorantala, and Jeremy Kun—are the codebase stewards. Because the project is young and the team is small, we want to reduce our workload. One important aspect of that is keeping up to date with the upstream MLIR project and incorporating bug fixes and new features into HEIR. Google also wishes to stay up to date with MLIR and LLVM, and so it has tooling devoted to integrating new MLIR changes into Google’s monorepo every few hours. As part of that rotation, a set of approved internal projects that depend on MLIR (like TensorFlow) are patched to support breaking changes in MLIR. HEIR is one of those approved projects.
As shown in the previous section, the cost of this is that no change can go into HEIR without at least two Googlers approving it, and the project is held to a specific set of code quality standards, namely Google’s. We acknowledge these quirks, and look forward to the day when HEIR is useful enough and important enough that we can revisit this governance structure with the community.
Pre-Commit
We use pre-commit to manage a series of git
pre-commit hooks for the project; for example, each time you commit code, the
hooks will make sure that your C++ is formatted properly. If your code isn’t,
the hook will format it, so when you try to commit the second time you’ll get
past the hook. Configuration for
codespell, which catches
spelling mistakes, is in pyproject.toml.
All hooks are defined in .pre-commit-config.yaml. To install these hooks,
first run
pip install -r requirements.txt
You will also need to install ruby and go (e.g., apt-get install ruby golang)
which are used by some of the pre-commits. Note that the pre-commit environment
expects Python 3.11
(Installing python3.11 on ubuntu).
Then install the hooks to run automatically on git commit:
pre-commit install
To run them manually, run
pre-commit run --all-files
Tips for building dependencies / useful external libraries
Sometimes it is useful to point HEIR to external dependencies built according to the project’s usual build system, instead of HEIR’s bazel overlay. For example, to test upstream contributions to the dependency in the context of how it will be used in HEIR.
MLIR
Instructions for building MLIR can be found on the
Getting started page of the MLIR
website. The instructions there seem to work as written (tested on Ubuntu
22.04). However, the command shown in Unix-like compile/testing: may require a
large amount of RAM. If building on a system with 16GB of RAM or less, and if
you don’t plan to target GPUs, you may want to replace the line
-DLLVM_TARGETS_TO_BUILD="Native;NVPTX;AMDGPU" \
with
-DLLVM_TARGETS_TO_BUILD="Native" \
OpenFHE
A simple way to build OpenFHE is to follow the instructions in the openfhe-configurator repository. This allows to build the library with or without support for the Intel HEXL library which adds AVX512 support. First, clone the repository and configure it using:
git clone https://github.com/openfheorg/openfhe-configurator.git
cd openfhe-configurator
scripts/configure.sh
You will be asked whether to stage a vanilla OpenFHE build or add support for HEXL. You can then build the library using
./scripts/build-openfhe-development.sh
The build may fail on systems with less than 32GB or RAM due to parallel
compilation. You can disable it by editing
./scripts/build-openfhe-development.sh and replacing
make -j || abort "Build of openfhe-development failed."
with
make || abort "Build of openfhe-development failed."
Compilation will be significantly slower but should then take less than 8GB of memory.